Single-Sign On
Custom Single-Sign On (SSO) Identity providers, can be enabled to facilitate the process of quickly onboarding team members from your organization.
In order to configure SSO access, first sign in to the LocalStack Web application under app.localstack.cloud. In your profile settings, navigate to the Single Sign-on tab which will list existing SSO Identity Providers (if any exist).

Next, click the button to create a new identity provider (IdP), where you can choose between the two leading industry standards:
- OpenID Connect (OIDC): openid.net/connect
- SAML: saml.xml.org/saml-specifications
Configuring SSO using OpenID Connect (OIDC)
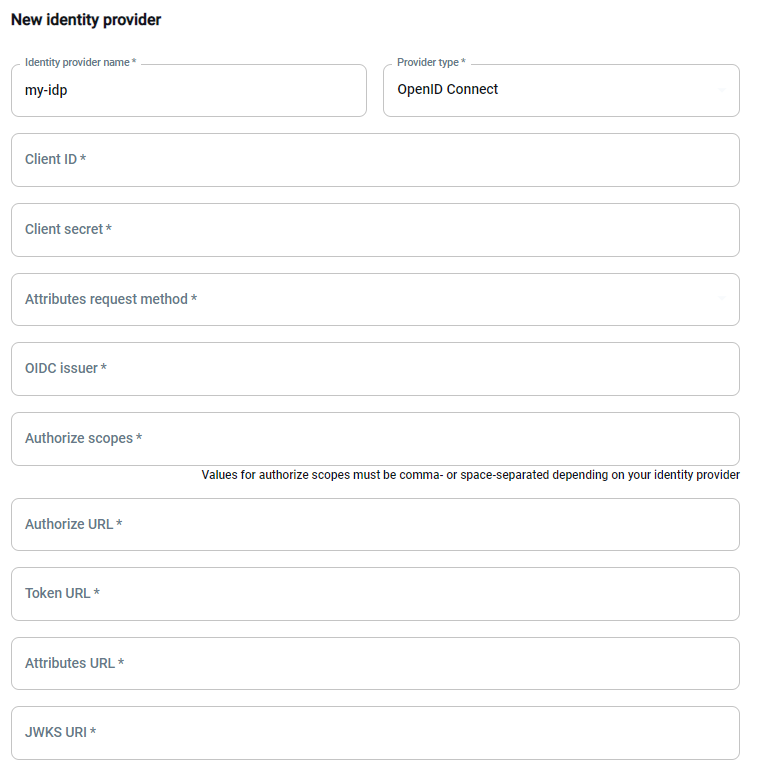
Section titled “Configuring SSO using OpenID Connect (OIDC)”In the form illustrated below, you can then enter the main information for the new IdP (using OpenID Connect):
- Name of your identity provider
- Client ID, Client Secret, Attributes request method, OIDC issues, Authorize scopes, and more.
- You should be able to find these attributes in your OIDC IdP configuration.
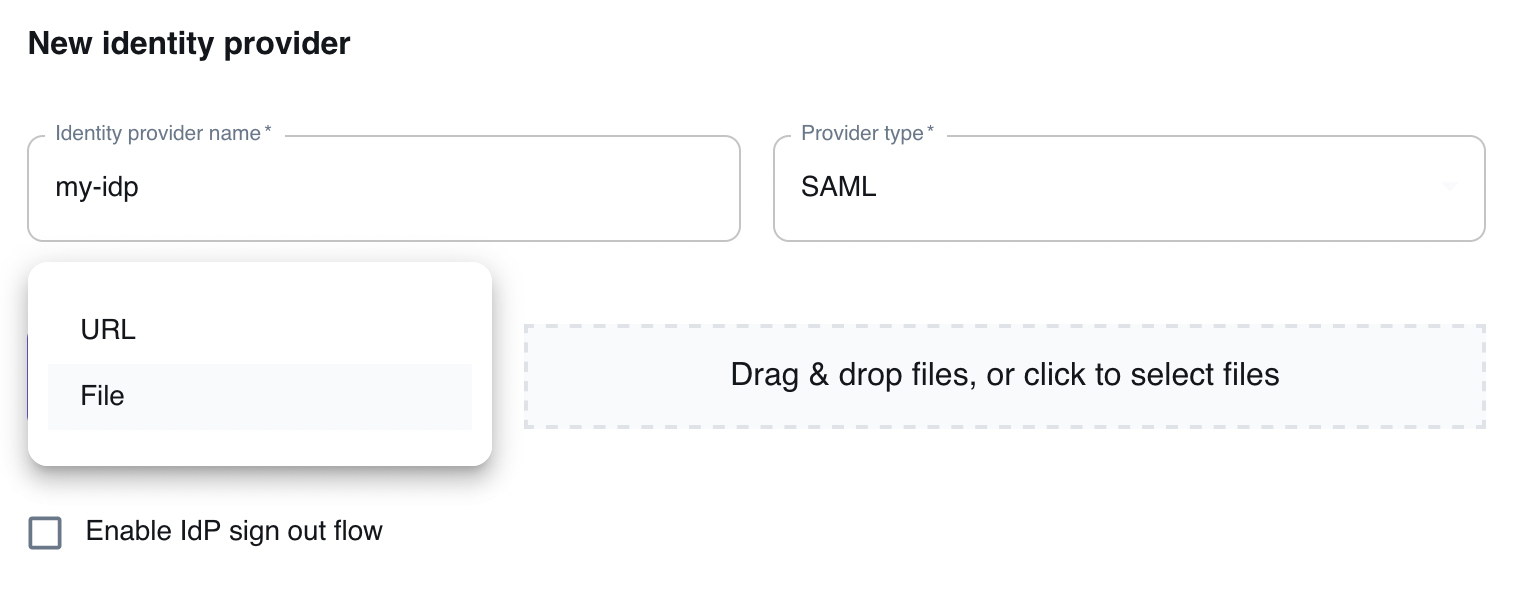
Configuring SSO using SAML
Section titled “Configuring SSO using SAML”When configuring SSO using SAML, you can configure the settings of the Identity Provider via a standard SAML metadata file (see illustration below). The SAML metadata file can be specified either via URL or via a file upload.
Select Enable IdP sign out flow if you want your users to be logged out from our app and your SAML IdP when they log out from your our Web Application.
Configuring SSO with Okta
Section titled “Configuring SSO with Okta”This section provides a reference configuration for setting up SAML-based SSO with Okta.
The steps below mirror the fields required in the LocalStack UI and can be used as a template when configuring your Okta application.
1. Create a SAML 2.0 App in Okta
Section titled “1. Create a SAML 2.0 App in Okta”In your Okta Admin Dashboard, create a new application under:
Applications → Create App Integration → SAML 2.0
During setup, Okta will ask for:
- Single sign-on URL
- Audience URI (SP Entity ID)
You can copy these values directly from your LocalStack SSO provider creation screen.
Example mapping:
| LocalStack name | Okta field name |
|---|---|
| Callback URL | Single sign-on URL |
| Identifier (Entity Id) | Audience URI (SP Entity ID) |
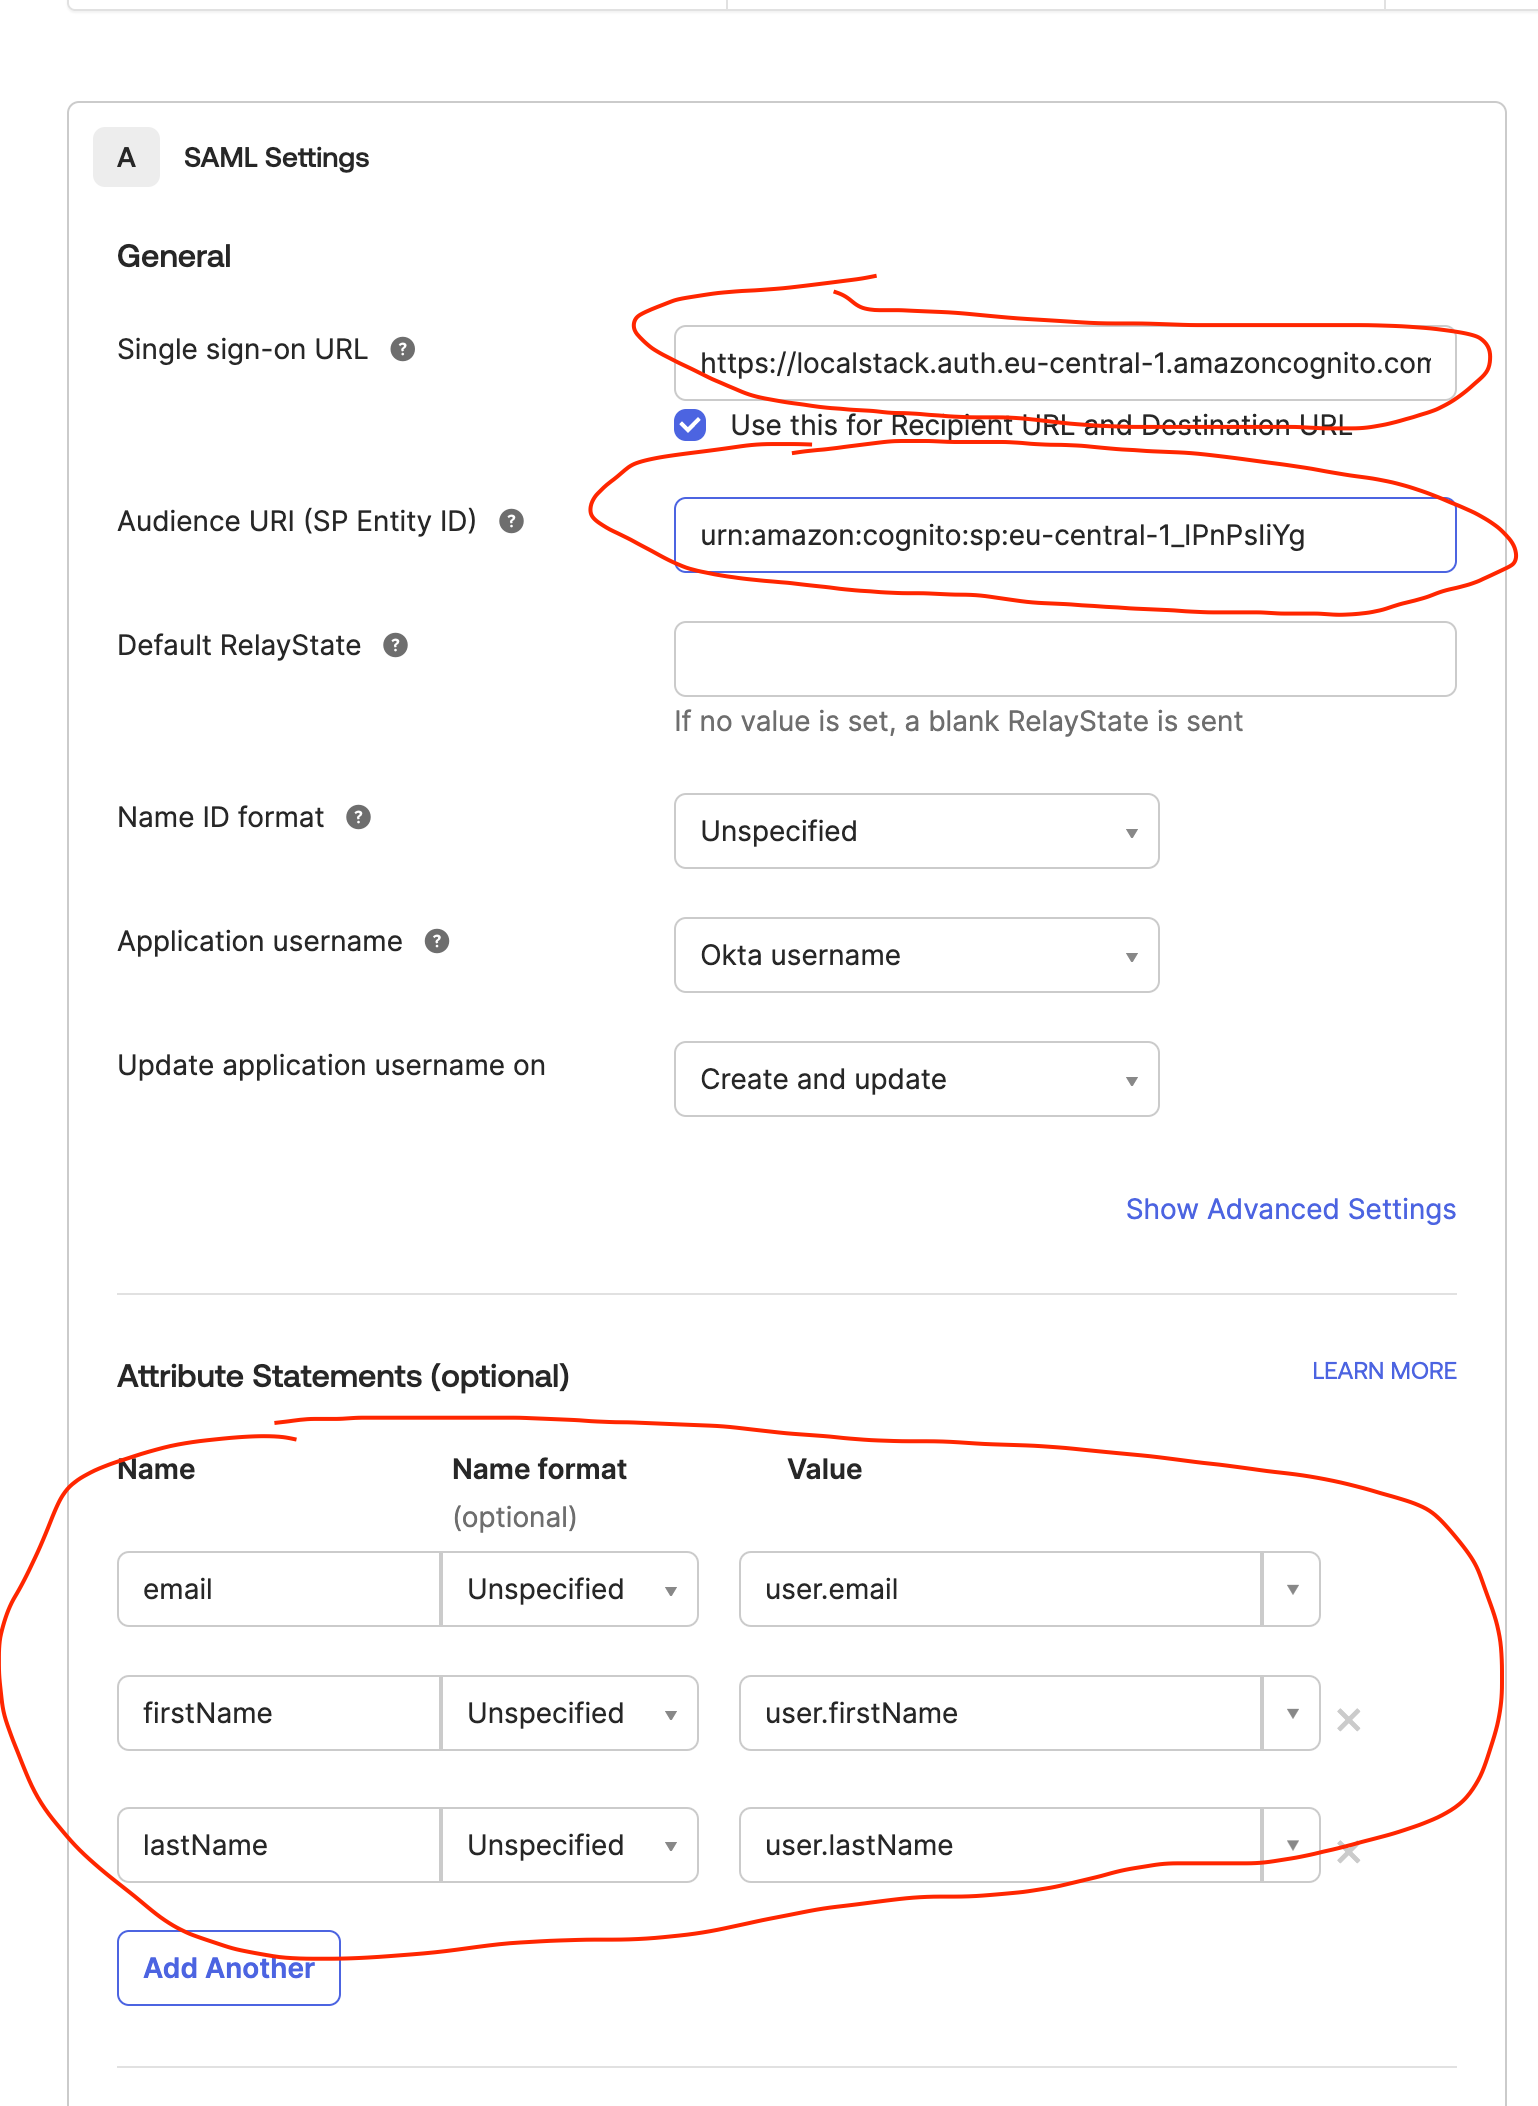
2. Configure SAML Attribute Statements
Section titled “2. Configure SAML Attribute Statements”LocalStack supports mapping the following user attributes:
- firstName
- lastName
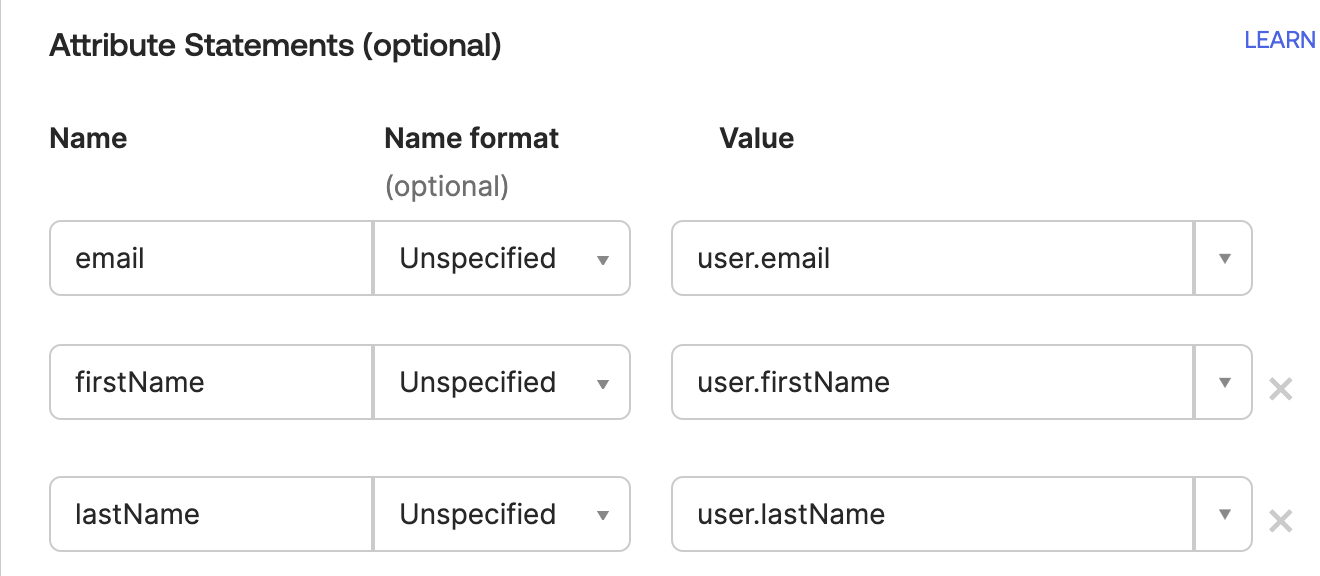
In Okta, add these under Attribute Statements (optional):
| Name | Name format | Value |
|---|---|---|
| Unspecified | user.email | |
| firstName | Unspecified | user.firstName |
| lastName | Unspecified | user.lastName |
Note: In some setups, Okta may not always populate
firstNameorlastNameduring signup. This is usually a configuration mismatch on the IdP side. Users can still manually enter these fields during signup if needed.
3. Retrieve the Okta Metadata URL
Section titled “3. Retrieve the Okta Metadata URL”Once the application is created, navigate to:
Applications → Sign On → SAML 2.0 → Metadata URL
Copy this URL.

This URL should be used in the LocalStack UI under:
Metadata File → URL
LocalStack will automatically import the SAML metadata and map the endpoints required for SSO.
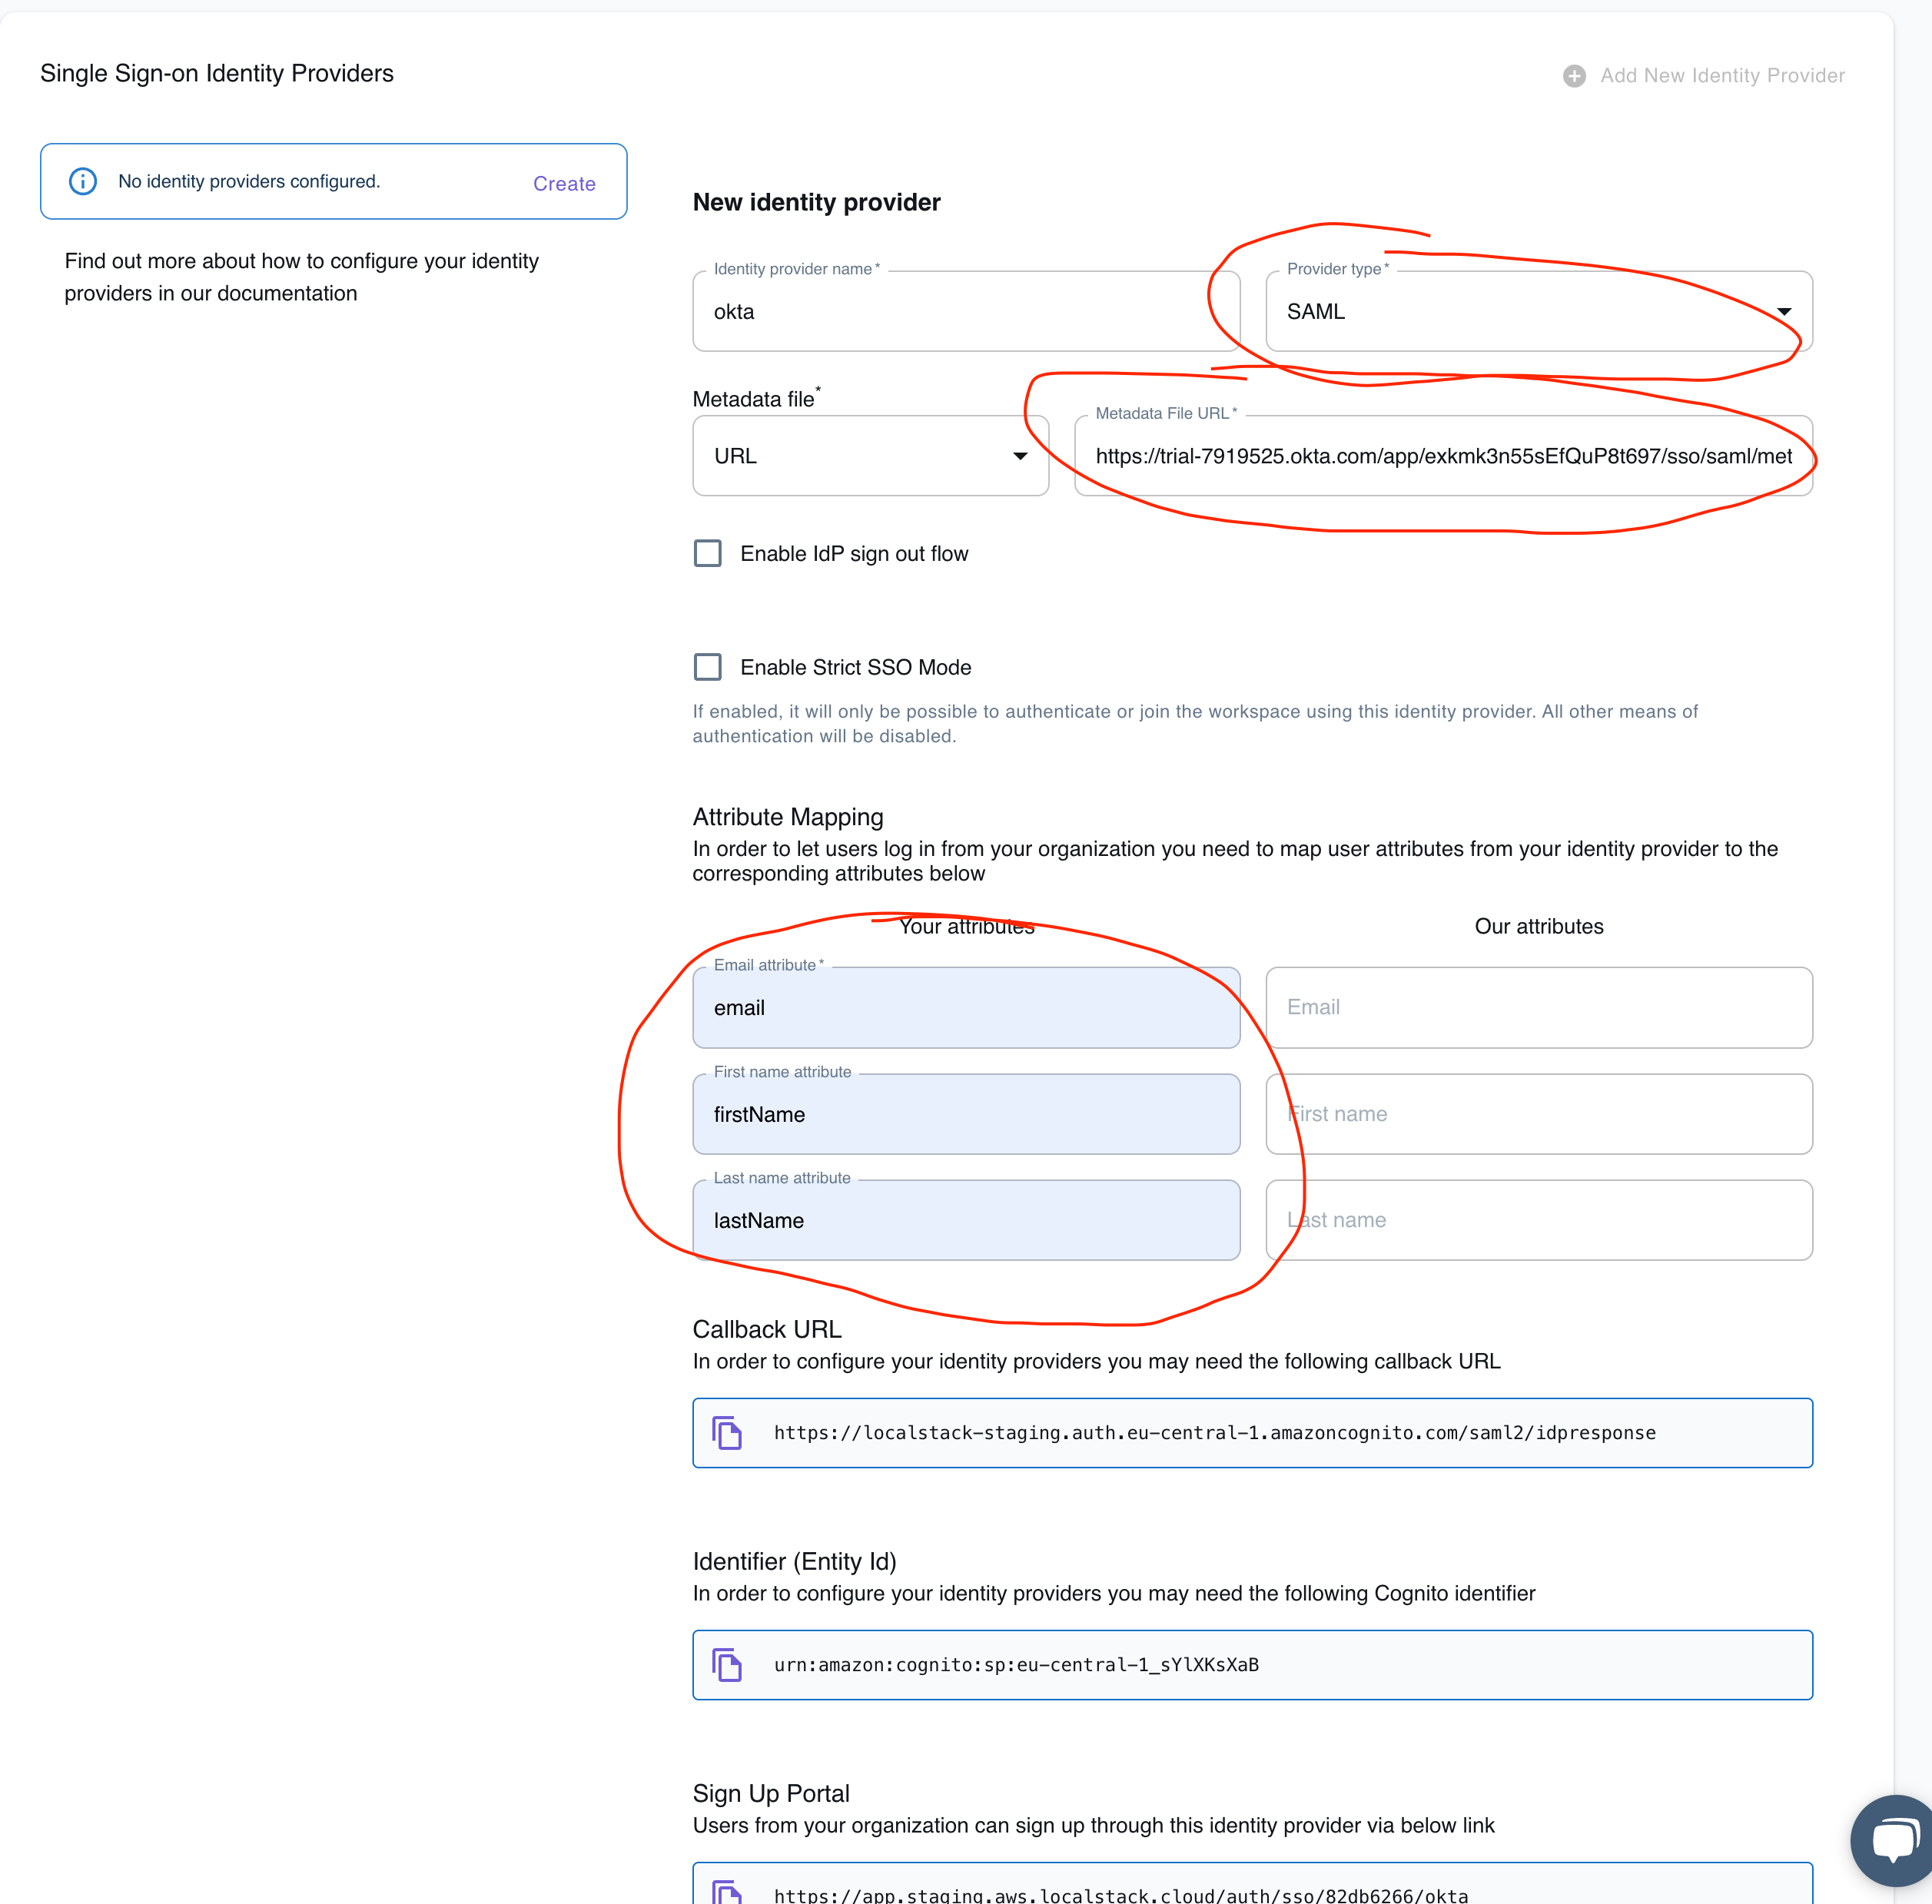
4. Configure LocalStack Identity Provider
Section titled “4. Configure LocalStack Identity Provider”In the LocalStack SSO configuration screen:
- Select Provider type: SAML
- Enter an Identity provider name (e.g., “Okta”)
- Paste the Metadata URL from Okta
- Fill in attribute mappings:
| Your attributes (from Okta) | LocalStack attributes |
|---|---|
| firstName | First Name |
| lastName | Last Name |
Once completed, LocalStack will display:
- Callback URL
- Identifier (Entity Id)
- Sign Up Portal URL
These values are used in the Okta app configuration and for distributing the signup link to end-users.
5. Assign Users to the Okta Application
Section titled “5. Assign Users to the Okta Application”Ensure that the correct users and groups have access to the Okta SAML app. Only assigned users will be able to authenticate into LocalStack via SSO.
SSO for JumpCloud
Section titled “SSO for JumpCloud”This example outlines the required configuration when using JumpCloud as a SAML Identity Provider for LocalStack.
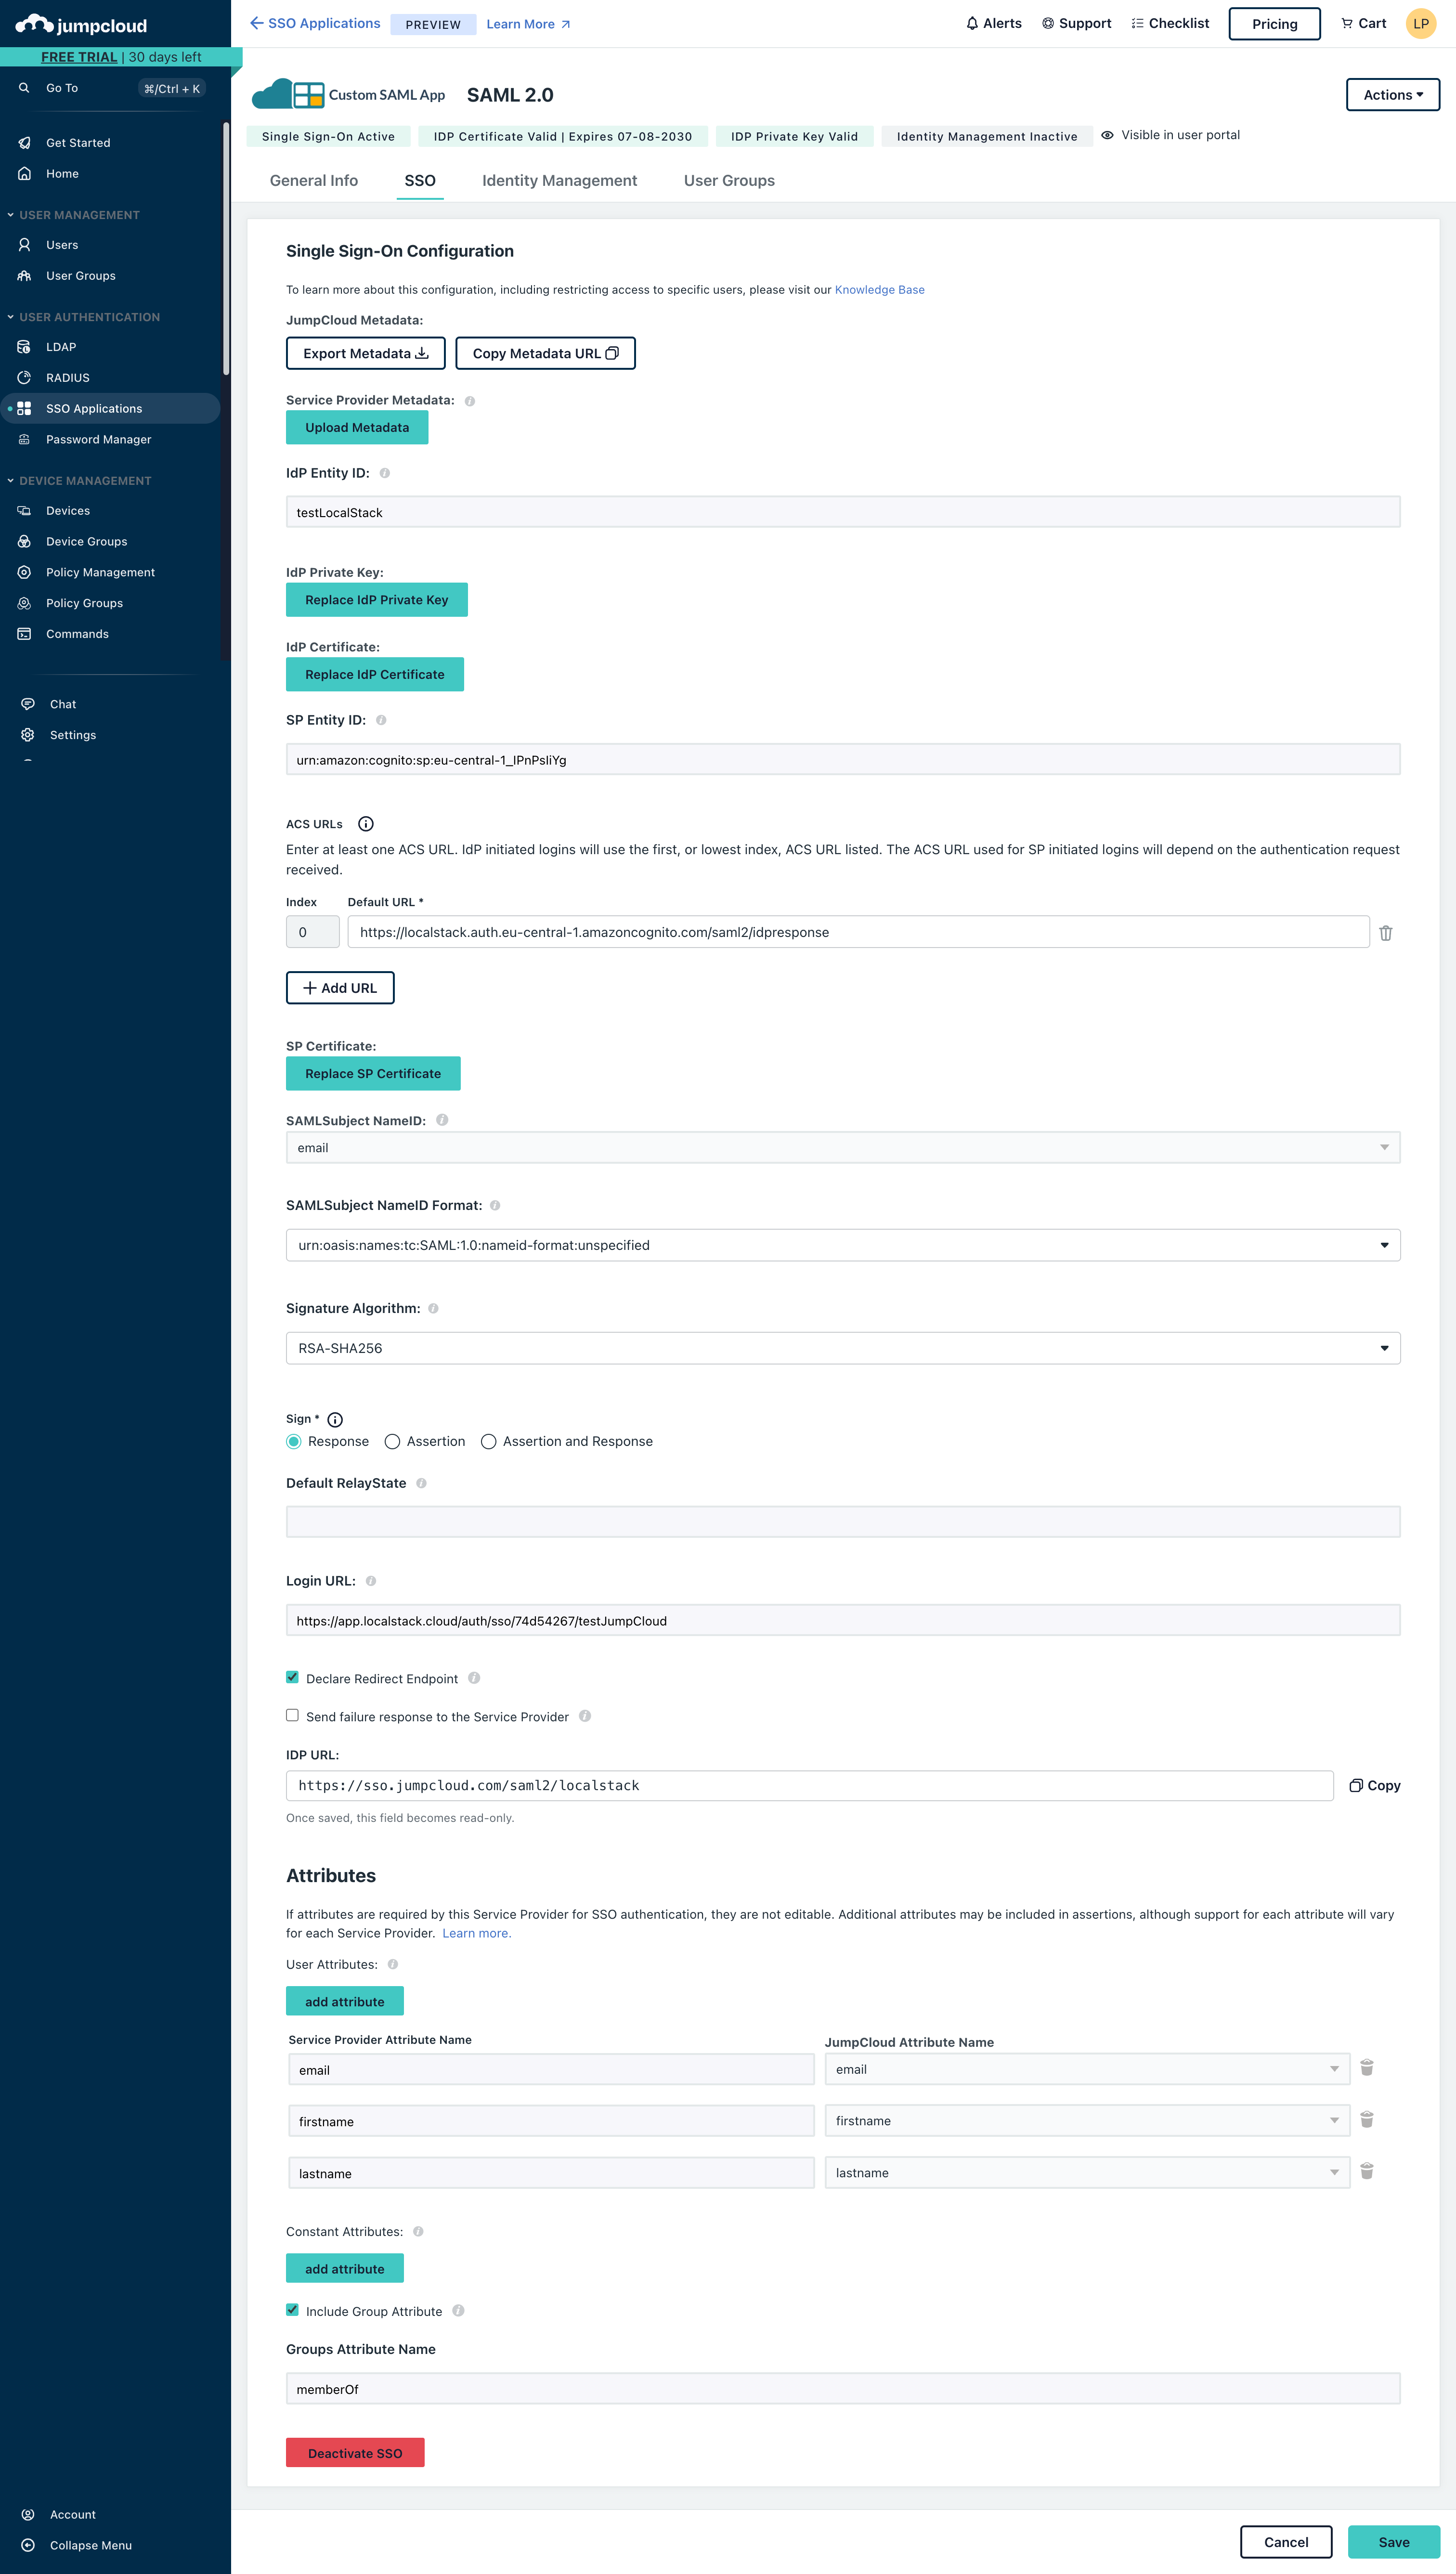
1. Create a Custom SAML Application
Section titled “1. Create a Custom SAML Application”In the JumpCloud Admin Portal:
- Go to SSO Applications → Add New Application
- Select Custom Application
- Open Manage Single Sign-On (SSO) and choose Configure SSO with SAML

2. Map Required Fields
Section titled “2. Map Required Fields”Copy the fields from the LocalStack SSO configuration screen into the corresponding JumpCloud fields.
| JumpCloud field | LocalStack value |
|---|---|
| IdP Entity ID | Identity provider name |
| SP Entity ID | Identifier (Entity Id) |
| ACS URLs | Callback URL |
| Login URL | Sign Up Portal |
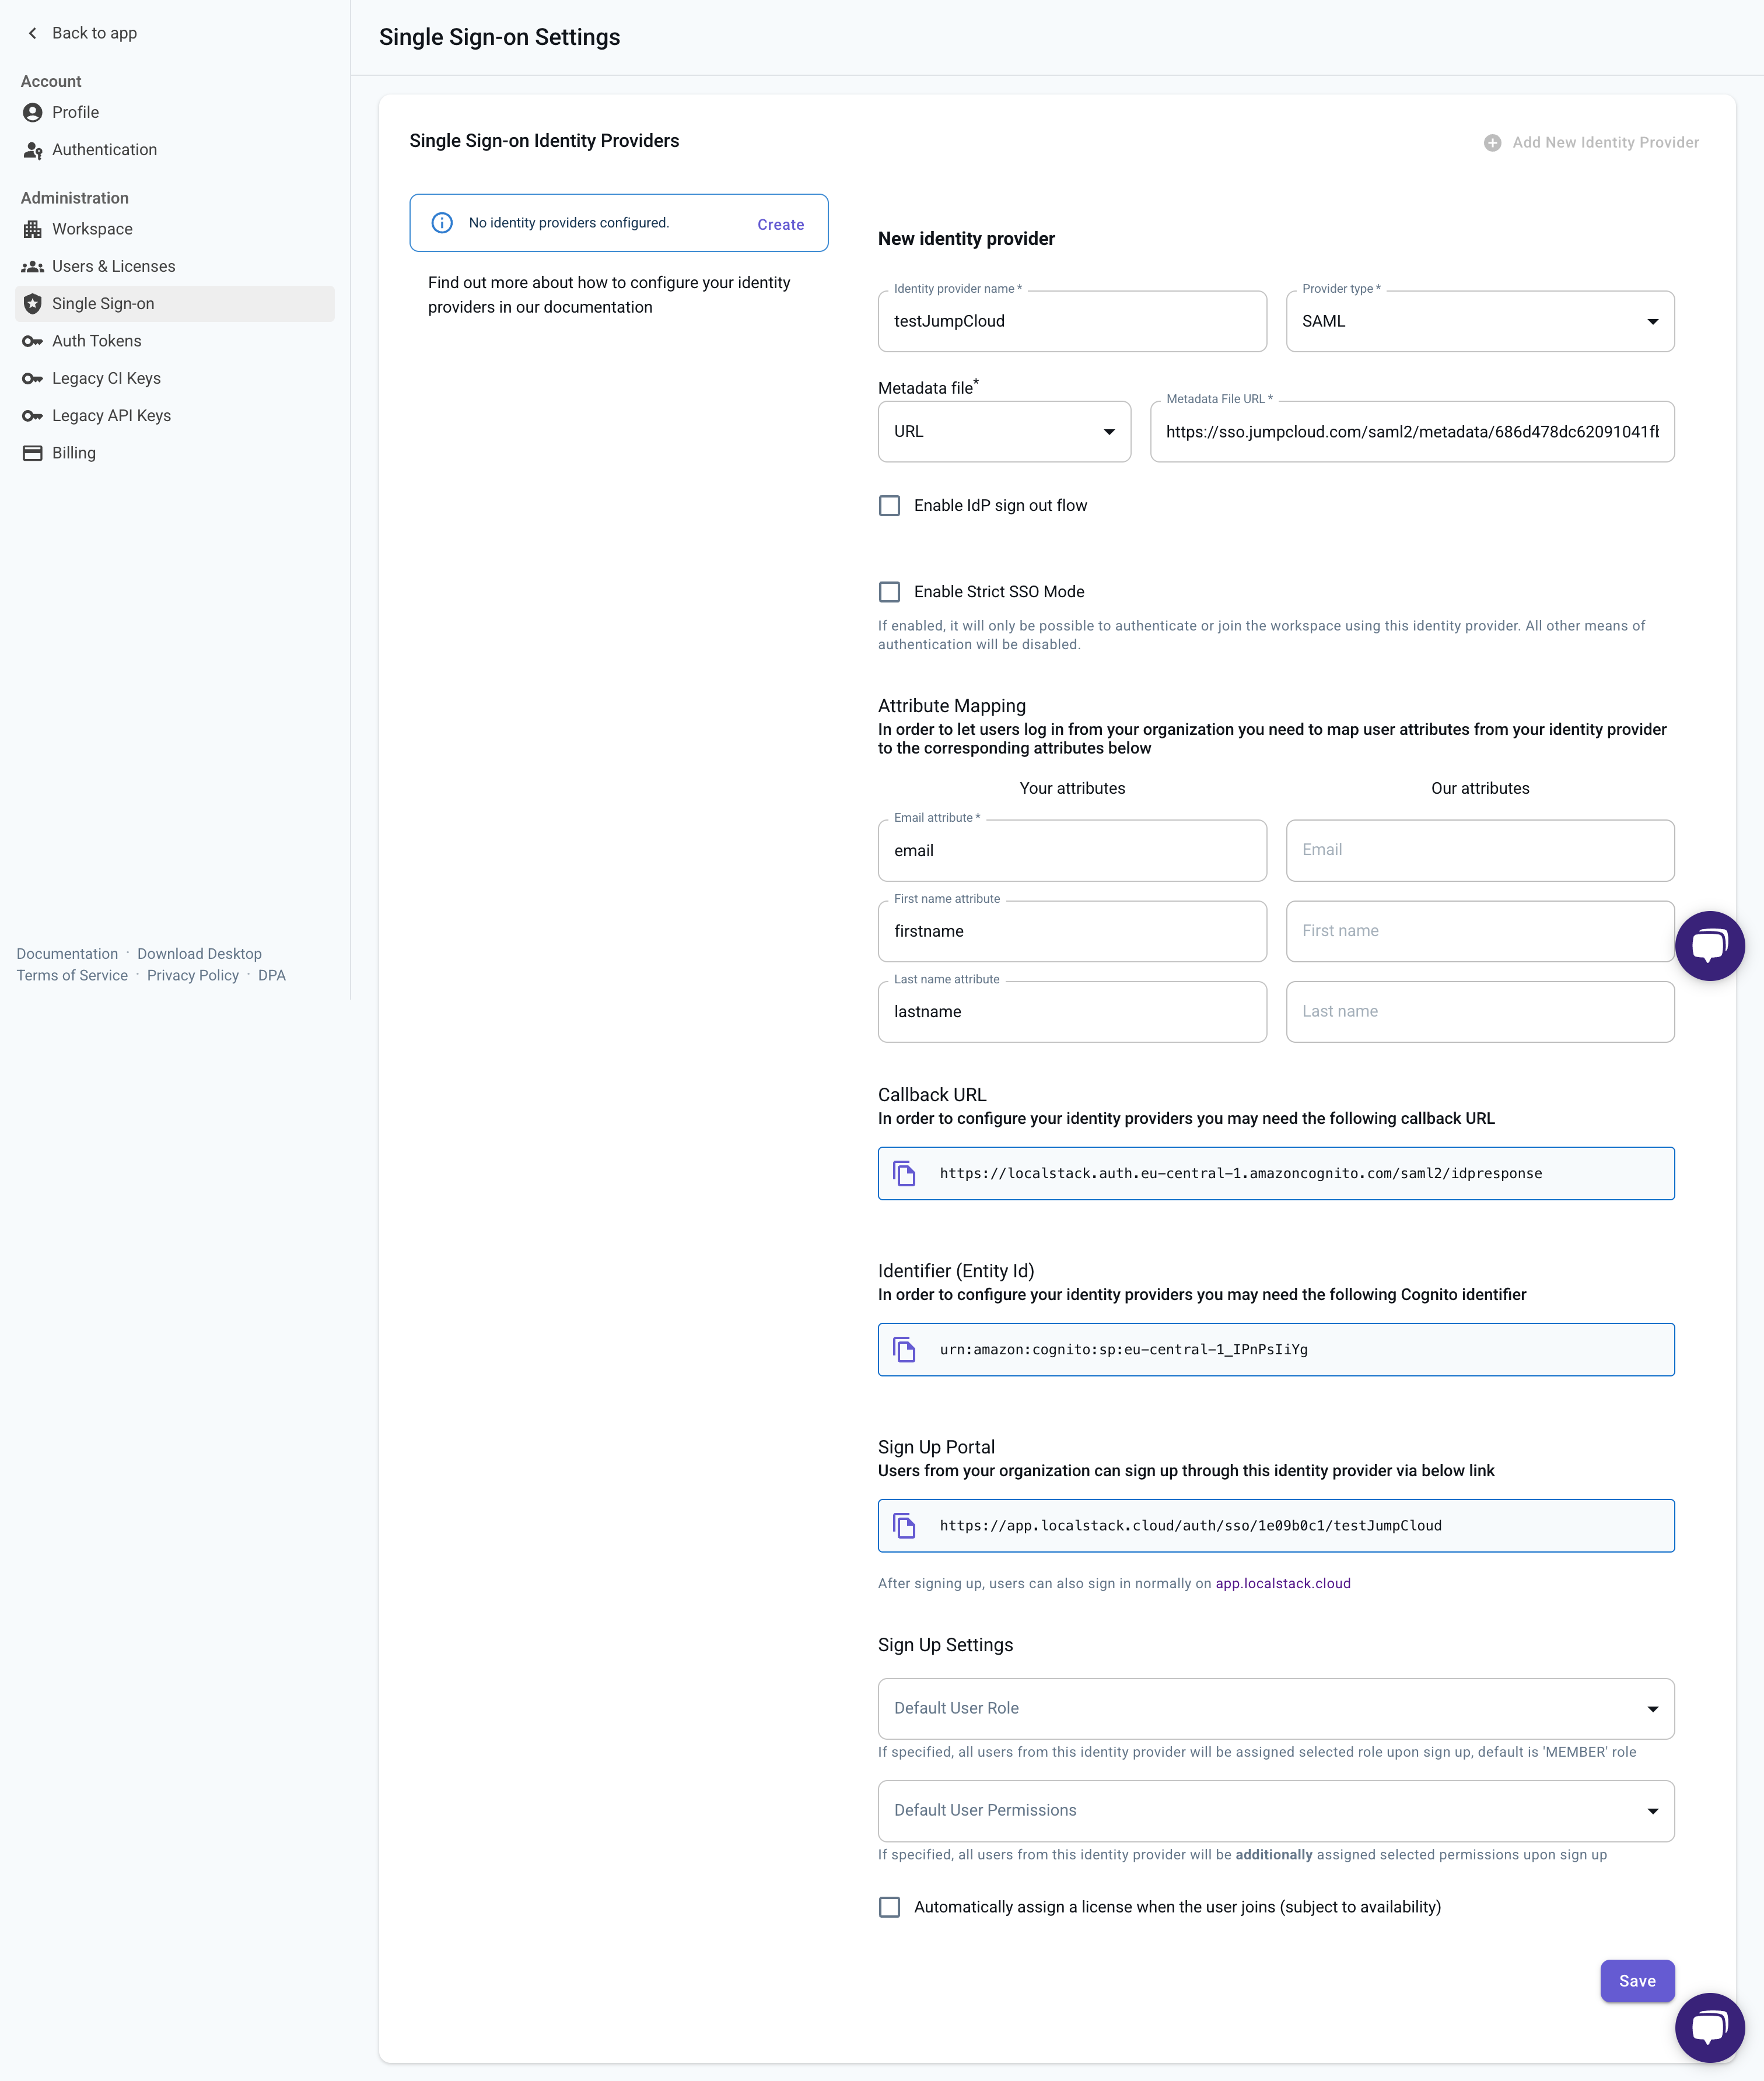
3. Attribute Mapping
Section titled “3. Attribute Mapping”Add the following user attributes:
| Service Provider Attribute | JumpCloud Attribute |
|---|---|
| firstname | firstname |
| lastname | lastname |
4. Required Options
Section titled “4. Required Options”Ensure the following options are enabled:
-
Declare Redirect Endpoint
-
Include Group Attribute with the name:
memberOf
5. Assign Users
Section titled “5. Assign Users”Save the application and assign users or groups who should access LocalStack via SSO.
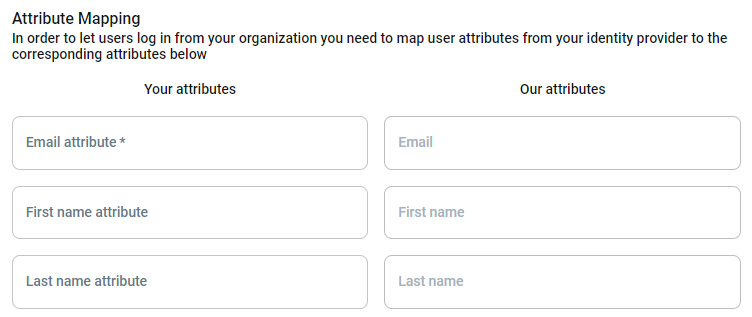
Attribute mapping
Section titled “Attribute mapping”These attributes can be defined to automatically map attributes of user entities in your internal IdP to user attributes in the LocalStack platform.
The following user attribute mappings can currently be configured:
- First name
- Last name
The Email should be configured to ensure correct functionality.
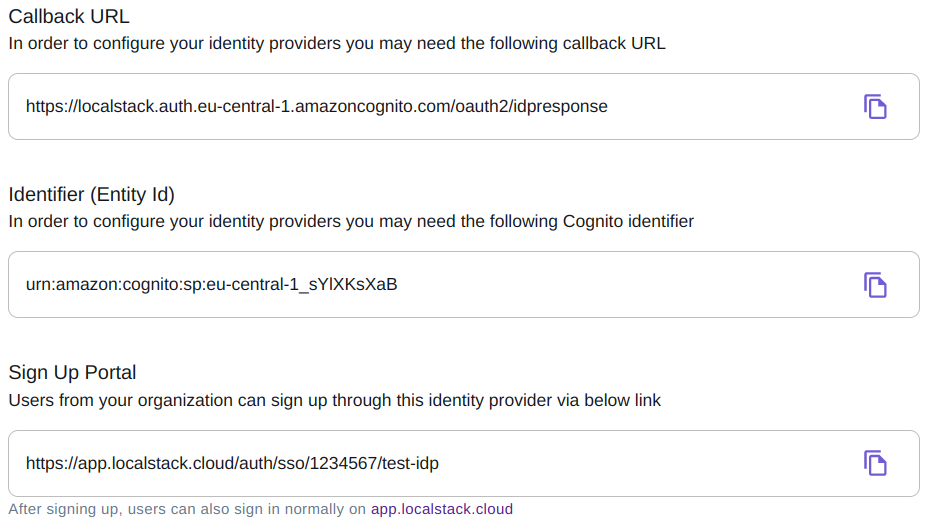
Callback URL, Sign Up Portal URL and Identifier (Entity Id)
Section titled “Callback URL, Sign Up Portal URL and Identifier (Entity Id)”After configuring the base details for your Identity Provider (IdP), the following additional information can be copied from the UI:
- Callback URL: The Callback URL that you may need to configure in the settings of your IdP.
- Identifier (Entity Id): The Identifier (Entity Id) that you may need to configure in the settings of your IdP.
- Sign Up Portal URL: This is the URL that can be shared with your users to start the SSO signup flow for the LocalStack Web Application.
The format of this endpoint is
https://app.localstack.cloud/auth/sso/<organizationId>/<ssoName>
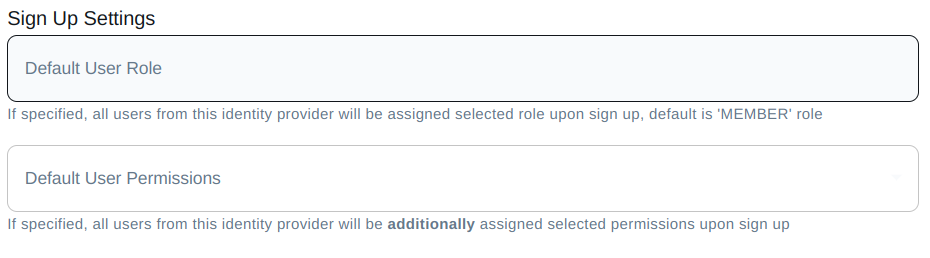
User Roles and Permissions
Section titled “User Roles and Permissions”For each new member that joins your org, you can specify user roles and permissions that should be assigned to them.
- Default User Role: The Role that should be assigned to users of your organization signing up via SSO. In most cases, this should be a Member.
- Default User Permissions: Use this to define which permissions should be assigned to users of your organization signing up via SSO.
- Tip: In order to enable self-serve licences (i.e., allowing your users to allocate themselves their own license), make sure to select the Allow member to issue a license for themselves (or a legacy API key) permission.